Connecting ESP8266 with ILI9341 TFT Display
Posted on Fri 04 March 2016 in ESP8266/ESP32 • View Comments
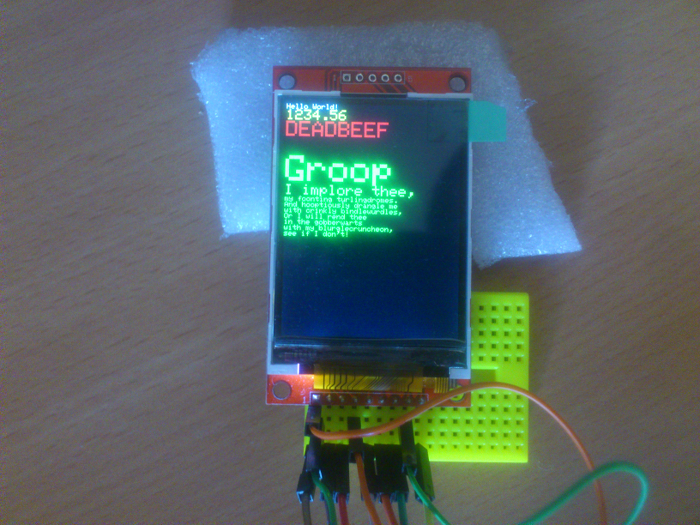
ESP8266 was popular with hobbyists for a long time. Recently I decided to join the hype and bought this module along with a super cheap color TFT display (ILI9341). In this post I will describe the process of connecting those two, using already available code written for Arduino.

First step is to set up Arduino IDE to work with ESP8266.
There is an excellent tutorial on Sparkfun's website that explains how to do this.
Once Arduino IDE is setup, you need to get the Adafruit ILI9341 library. Currently version 1.0.1 is available through Arduino IDE's "manage libraries" interface. Unfortunately this version is broken for ESP8266.
Update 2019: There is a faster library with more features called TFT_eSPI and you can use it instead. See explanation in the follow up blog post.
Until this is fixed, you have to get it directly from the Adafruit repository. One can git clone it or download the zip. Put it into the arduino library folder. The exact location is OS and IDE version depndent.
After this, fire up the IDE. If previous step was performed correctly, Under the file->examples sub-menu you should be able to see Adafruit ILI9341 menu. Choose the graphicstest example and try to compile it. If it compiles fine, you are ready for wiring.
Wiring is a bit tricky. First look at the diagram of the nodemcu v3 board:
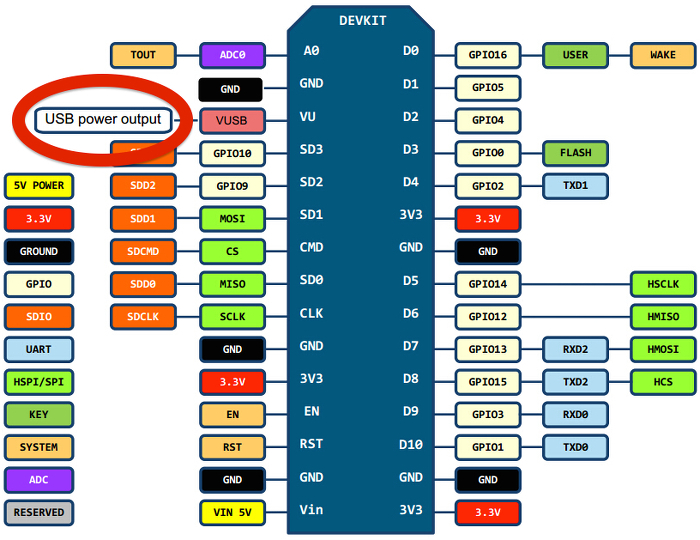
Make the following connections:
| ILI9341 | ESP8266 | |
|---|---|---|
| SDD/MISO | ⇔ | D6 |
| LED | ⇔ | 3.3V |
| SCK | ⇔ | D5 |
| SDI/MOSI | ⇔ | D7 |
| DC/RS | ⇔ | D1 |
| RESET | ⇔ | 3.3V |
| CS | ⇔ | D2 |
| GND | ⇔ | GND |
| VCC | ⇔ | 3.3V |
Make sure you connect all display's pins. Some tutorials do not mention RESET and LED pins and it took me some time to figure out that these can not be left floating.
Now you need to alter the example sketch to reflect the fact that we chose D1 and D2 for CS and DC. Edit the configuration lines to be:
// For the Adafruit shield, these are the default.
#define TFT_DC D1
#define TFT_CS D2
Now connect the board to the computer, build and upload. You should be able to see a a test pattern start running on the TFT screen.
Unfortunately, at some point the test pattern will freeze or even reset the device before the program completes the execution.
If you open serial monitor, you will see something like this:
���ԅu�D�ILI9341 Test!
Display Power Mode: 0x9C
MADCTL Mode: 0x48
Pixel Format: 0x5
Image Format: 0x0
Self Diagnostic: 0xC0
Benchmark                Time (microseconds)
Screen fill              2259125
Text                     161736
Lines
Soft WDT reset

ctx: cont
sp: 3ffef8d0 end: 3ffefbd0 offset: 01b0

>>>stack>>>
3ffefa80:  016e3600 00000001 3ffeea58 000007e0
3ffefa90:  00000080 00000008 3ffeea58 402032f8
3ffefaa0:  3ffeea9c 00000001 3ffeea58 0000006c
3ffefab0:  0000006d 0000002a 3ffeea58 40203378
3ffefac0:  3ffeea9c 000000f6 3ffeea58 402037b2
3ffefad0:  000000f7 000000f6 3ffeea9c 402027ab
3ffefae0:  016e3600 00000001 3ffeea58 000007ff
3ffefaf0:  0000006c 000000f6 3ffeea58 40203876
3ffefb00:  016e3600 00000001 3ffeeb7c 00000000
3ffefb10:  00000000 000000f0 3ffeea58 000000ef
3ffefb20:  0000006c 000000ef 0000005f 402046e1
3ffefb30:  00000000 00000001 000007ff 00000085
3ffefb40:  3ffeea58 000000f6 402044b8 00000144
3ffefb50:  000000f0 000007ff 3ffeea58 00cb82d4
3ffefb60:  000000ba 000007ff 3ffeea58 40201c40
3ffefb70:  0000013f 000000ef 00000140 000000ef
3ffefb80:  000000ef 3ffeeba8 402044b8 3ffeebb0
3ffefb90:  3ffeeb7c 00000018 4022d52d 3ffeeba8
3ffefba0:  00000000 000000c0 3ffeeb7c 40202398
3ffefbb0:  3fffdc20 00000000 3ffeeba0 402044f6
3ffefbc0:  00000000 00000000 3ffeebb0 40100114
<<<stack<<<
The problem here is that ESP8266 has a watchdog set to one second. The lines test pattern takes longer than one second to execute and therefore the watchdog resets the processor.
The ILI9341 example is already "feeding" the watchdog using the yield(); call. Unfortunately, on the ESP8266, some code between the yield(); calls still takes more than one seconds (this code was written with Arduino in mind). To make this example run, you will have to add additional yield(); calls. Use trial and error method to figure out where to add those.
Disabling the watchdog is also a viable options, but I was not able to figure out how to do it. If you find a way to do this, write me through the comments.